Register time - Week-by-Week overview
In order to be able to report time there has to be at least one
project/activity created.
Time registration made easy
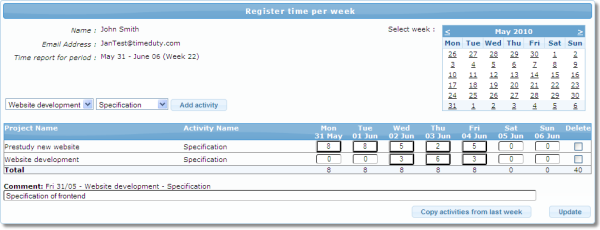
Week by week time sheet enables quick and easy time registration of time spent on projects.
To start registering time:
- Select week - The current week is selected by default but if you want to change week just select the wanted
date in the calendar (any date in the week you want to select will work).
- Select the project and activity you want to register time on and press the button
'Add activity'. A new row is created in the timesheet and you are ready to register time.
- Enter time spent on the activity in the timesheet. If you want to enter minutes the format
is Hours:Minutes (Example 1:45)
- Add other projects/activites if needed. When you are done, press 'Update' to save the timesheet.

Extra possibilities
There are several extra possibilities that can be used when registering time:
- Add comments - In each cell of the timesheet (where hours > 0) you can store a comment of the
work done. After selecting the cell containing the time you want to comment a text field appears
under the timesheet. Enter the comment you want to save. After the timesheet is saved the cells
containing comments is marked with an extra outline. To view the comment just press the cell.
- Copy projects/activities from last week - Do you often register time on the same
activities every week or just want to register on the same activities as last week you can use
the button 'Copy activities from last week'. This will not copy the time registered last week, just
the selected projects/activities making it easy for you to start registering time easily.